Wireless Sniffer Capture (How to)
Introduction
The process of collecting a good wireless sniffer trace, in order to analyze and troubleshoot 802.11 behavior, can be a difficult and time consuming operation. But there are a few things to bear in mind that will help simplify and speed up this process. With Wireless sniffing it helps to have an idea of what you are really trying to do - you are trying to capture the raw wireless frames from over the air, as seen by the wireless sniffing device itself.
Checklist for a successful capture
Step 1: Since the sniffing device, client device and AP are all using RF generating radios for transmission or reception, it helps to have your wireless sniffer close to your target device (the client machine). This will allow your sniffing device to capture a good approximation of what your client device is hearing over the air.
Step 2: Use a separate device to act as your wireless sniffer - you cannot take a good wireless sniffer trace if it is running on the device under test (the client machine you are trying to get a wireless trace of).
Step 3: Understand exactly what 802.11 Channel and Band your client device is using before setting up your capture. Lock your sniffer to the channel of interest - do not use the sniffer's "scan channels" mode! (With "scan channels", the sniffer will cycle from channel to channel every second or so - useful for a site survey or to find "rogues", but not when attempting to capture an 802.11 problem.)
Also bear in mind that your client device may roam to another AP which is on a different RF channel or Band, so you need to plan accordingly. Typically in the 802.11b/g (2.4GHz) environment, using a three channel sniffer may be required. This involves using 3 Wireless adapters on your sniffing device, with each one set to channel 1, 6 and 11. Using USB wireless adapters works best for this type of setup.
Step 4: If you are troubleshooting 5GHz, then the number of channels will dramatically increase. Since you might not have enough cards to capture all channels, it is a good practice for the test, to operate on not more than 4 channels on your surrounding Access Points.
Step 5: If you can reproduce the problem when a client roams from one channel to another, then a 2-channel sniff should suffice. If you have only a single channel sniffer available, then have it sniff the roamed-to channel.
Step 6: Always NTP sync your sniffers. The packet capture will need to be collated with debug captures, and with other wired and/or wireless captures. Having your timestamps even one second off will make the collation much more difficult.
Step 7: If you are capturing for a long period of time (hours), then configure your sniffer to cut a new capture file every 30MB or so. In order to avoid filling up your hard drive, you will want to put an upper limit on the number of files written.
Note: The Linksys USB600N does not reliably collect 11n packets with short guard interval. Missing 20% to 30% of short guard interval packets. If necessary the WLC configuration can be changed to only use the slower long guard interval. This should be only a temporary configuration change. The command is: config 802.11 {a | b}11nsupport guard-interval {any | long}
Sniffer Tools
Wireless Sniffing using a Mac with OS X 10.6 and above
Wireless sniffing on the Mac works well, as Mac OS X has built in tools to capture a wireless trace. However, depending on what versions of OS X you are running, the commands may vary. This document covers OS X 10.6 through 10.8.
Mac OS X Wireless Sniffing Tools
- airportd (10.6-10.8)
- airport utility (10.6 - 10.8)
- tcpdump (10.8)
- Wi-Fi Diagnostics (10.7, 10.8)
- Wireshark (10.6 - 10.8)
airportd
If you are running OS X 10.6 (Snow Leopard) or above, then you can easily use the command line utility “airportd". Use the following steps:
- Use the “command" + “Space bar" key combo to bring up the search diaglog box in the upper right top of the screen and type in the word “terminal", this will search for the terminal application, select this application to run it. A terminal window will appear.
- Once you have a terminal window open, you can run the follow command to capture a Wireless sniffer trace on RF channel 11 (802.11b/g):
“sudo /usr/libexec/airportd en1 sniff 11"
Some things to note:
- You will be prompted to enter in your account password for verification.
- You cannot specify the name of the capture file or where you will place the output.
- You will lose any wireless connectivity to your network while the capture is occurring.
- If you are using an Air, the wireless adapter is en0 rather than en1
- Once you are finished with the trace, hit “Cntl-C" to stop the trace and the utility will display the name and location of the capture file. The file format is your standard wireshark PCAP file that can be read on the MAC or Windows via Wireshark.
airport utility
The airport utility is is not a sniffer program; however, it can provide interesting information about the wireless LAN. Also, it has the ability to set the default wireless channel - which is crucial for sniffer programs (tcpdump, Wireshark) that are themselves unable to set the channel
Note: because the path to the airport utility is so ugly, it may be a good idea to set a symbolic link to it from a directory in the path, e.g.
# sudo ln -s /System/Library/PrivateFrameworks/Apple80211.framework/Versions/Current/Resources/airport /usr/sbin/airport
set the wireless channel
# sudo /System/Library/PrivateFrameworks/Apple80211.framework/Versions/Current/Resources/airport --channel=48
dump out info on the SSIDs/BSSIDs seen:
# sudo /System/Library/PrivateFrameworks/Apple80211.framework/Versions/Current/Resources/airport -s
SSID BSSID RSSI CHANNEL HT CC SECURITY (auth/unicast/group)
Test 00:24:97:89:cb:41 -53 11 Y -- WPA(PSK/TKIP/TKIP) WPA2(PSK/AES/TKIP)
Test2 00:24:97:89:cb:40 -53 11 N -- WPA(PSK/TKIP/TKIP)
Guest 00:22:75:e6:73:df -64 6,-1 Y -- WPA(PSK/AES,TKIP/TKIP) WPA2(PSK/AES,TKIP/TKIP)
detailed information on the current association:
# sudo /System/Library/PrivateFrameworks/Apple80211.framework/Versions/Current/Resources/airport –I
agrCtlRSSI: -54
agrExtRSSI: 0
agrCtlNoise: -89
agrExtNoise: 0
state: running
op mode: station
lastTxRate: 300
maxRate: 300
lastAssocStatus: 0
802.11 auth: open
link auth: wpa2-psk
BSSID: 0:24:97:95:47:60
SSID: GuestNet
MCS: 15
channel: 36,1
tcpdump
Tcpdump is a command line utility shipped with OS X that can perform packet capture. (The tshark utility bundled with Wireshark is very similar.) To perform a wireless packet capture using tcpdump:
- first set the channel using the airport utility as shown above
- then perform a wireless packet capture, saving to a file. When done, type Control/C to exit.
Example:
bash-3.2# tcpdump -I -P -i en1 -w /tmp/channel-11.pcap
tcpdump: WARNING: en1: no IPv4 address assigned
tcpdump: listening on en1, link-type IEEE802_11_RADIO (802.11 plus radiotap header), capture size 65535 bytes
^C
897 packets captured
968 packets received by filter
0 packets dropped by kernel
bash-3.2#
Wi-Fi Diagnostic
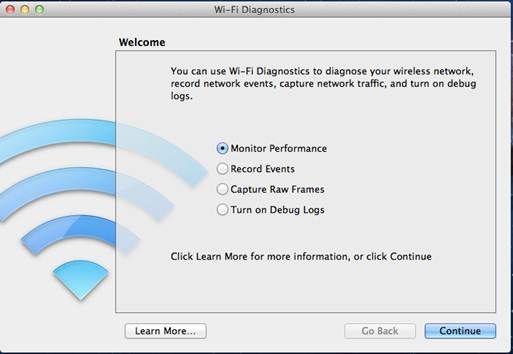
If you are running MAC OsX 10.7 (Lion), you can use the graphical program called Wi-Fi Diagnostics. It’s located in the following folder:
/System/Library/CoreServices
Normally this folder is not easily accessible so a quick trick is to open the “Finder" and use the "Go to folder" (“Shift-Command-G") option; this will open up a dialog box in which you can enter “/System/Library/CoreServices" and press return. There you will find the Wi-Fi Diagnostics program.
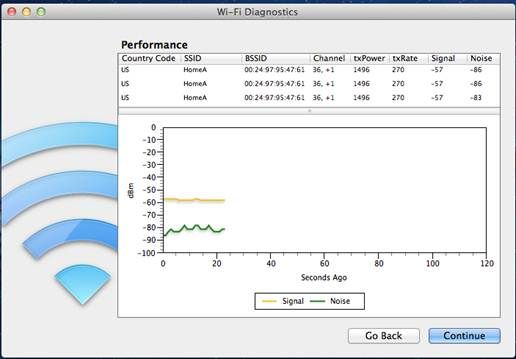
Here is a example of using the tool to monitor Wi-Fi Performance:
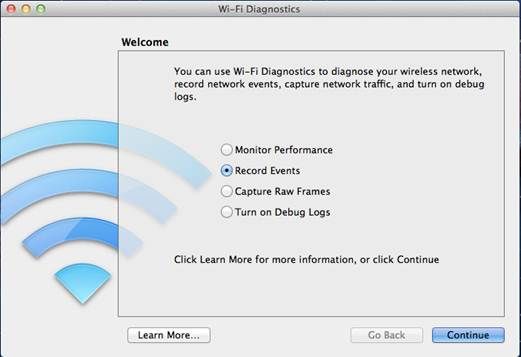
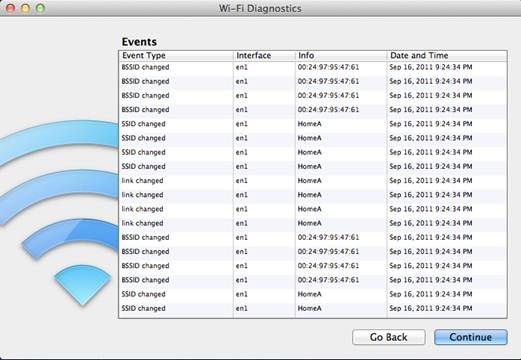
Here is any example of using the tool to record Wi-Fi Events:
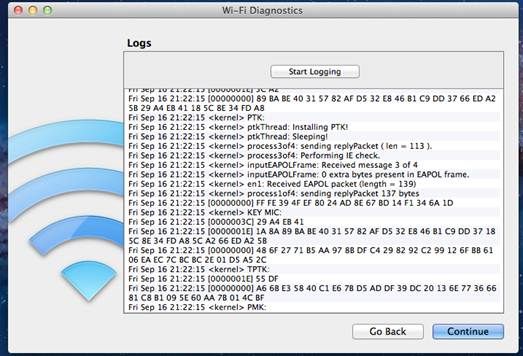
Here is any example of how to enable the Debug logs to be taken, this will allow you to see all messages that occur at the driver and supplicant level on the MAC

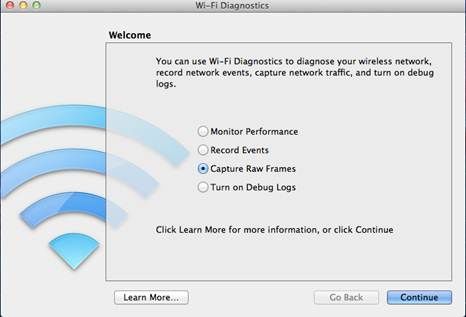
Here is an example of using the tool to capture raw Wireless frames that can be heard by the MAC.
In order to capture a complete wireless trace, select “Capture Raw Frames".
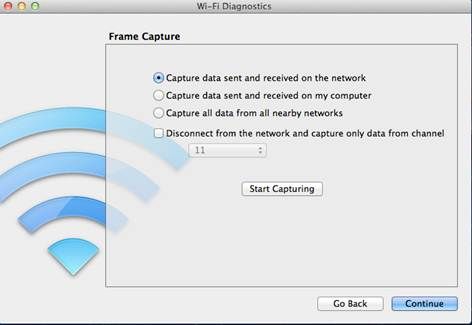
Check the box to disconnect from the network and select the channel that is being used by the client that are you sniffing. as you want to capture all data send and received on the network since we are using the sniffer to capture another wireless client’s frames
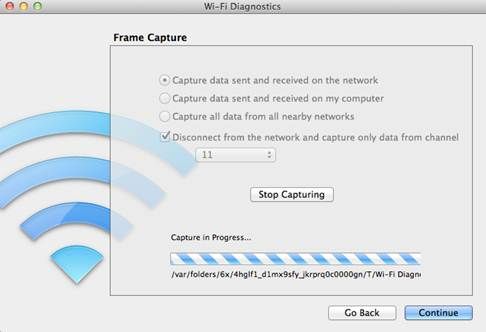
The trace will start after pushing the “Start Capturing" Button. Once you have finished the trace, push the “Stop Capturing" button and click on “Continue", a dialog will ask to either save the report to the Finder desktop or send it via an email.
Wireshark
Another option on the MAC to capture a wireless trace is to use Wireshark. This is a free program that can be downloaded from http://wireshark.org. (Note: this requires that X11 be installed - for OS X 10.8, this means downloading and installing Xquartz.)
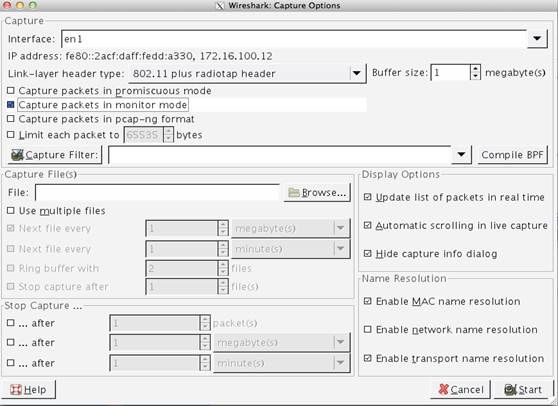
Once installed and started, select the capture option and fill out the dialog as follows:
- 1) Capture using interface “en1" which will be the wireless interface on the MAC
- 2) Select “Capture packets in monitor mode" which is needed to allow Wireshark to capture all wireless frames on the network. (If running Wireshark 1.8, doubleclick the en1 interface to bring up the necessary dialog box.)
- 3) The channel being sniffed will be the channel the MAC was associated to when Wireshark is started. While it is possible to change the channel being sniffed, you must do this via the “Airport" command on the terminal application, as described above. (For more detail, see the following URL:http://wiki.wireshark.org/CaptureSetup/WLAN)
Wireless Sniffing using Windows 7 with Netmon 3.4
Introduction
With Microsoft Network Monitor (Netmon) 3.4, you can now perform some decent 802.11a/b/g (and maybe 11n) wireless sniffing in Windows 7, using your standard wireless adapter. The file saved from Netmon can be read by latest (1.5 and above) Wireshark, though not in OmniPeek.
Netmon 3.4 is supported with XP SP3; however, it does not support wireless sniffing when running XP. As to Vista, experience is mixed; a reliable source reports that wireless sniffing does work in 64-bit Vista on a Macbook with BCM43xx 1.0 adapter.
Tested adapters/drivers
- An Intel 6300 running drivers 13.2.1.5 and 13.5.0.6, and an Intel 6205 running 14.2.0.10 and 15.9.1.2. These adapters works well with 11a/g but do not support 11n.
- A Linksys WUSB600Nv1 with Ralink driver 3.0.10.0. This driver says that it supports 11n (which function I didn't test). It seemed to report all packets as having an RSSI of -50, and as being of data rate "3.5 Mbps".
- An Atheros AR9285 with driver 8.0.0.258. Driver reports 11n support (not tested.) RSSI values and data rates look sound.
- A Cisco CB21AG with Atheros driver 1.0.0.120 - this also reported weird data rates (1Mbps showed up as "116 Mbps" and 11 Mbps as "124 Mbps".)
Install Netmon 3.4
Download Netmon 3.4 from Microsoft. If running Win7 64bit, get and install NM34_x64.exe. You'll have to log off and back on again after installing.
Sniff wireless packets from a channel
Note: if using PROSet for Win7, set it to "Use Windows to Manage WiFi". Otherwise, PROSet is apt to take control of the adapter out from under Netmon, and you will wind up sniffing the wrong channel.
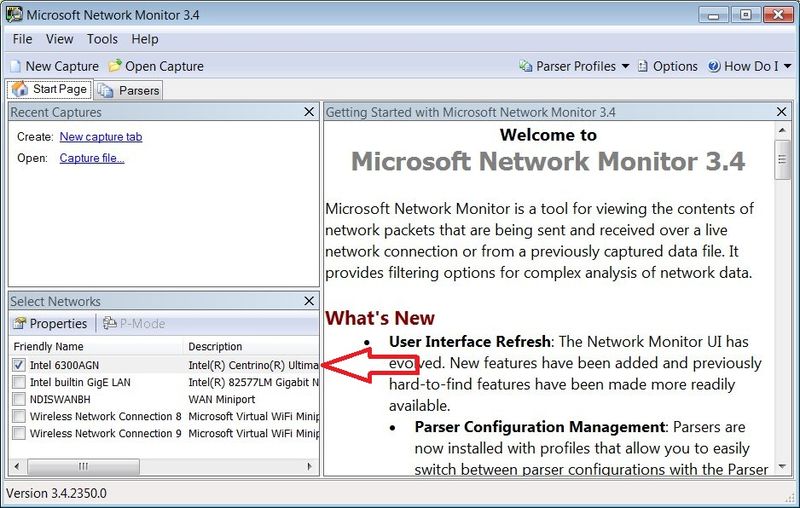
Launch Netmon. Check the wireless adapter of interest, and uncheck the others.
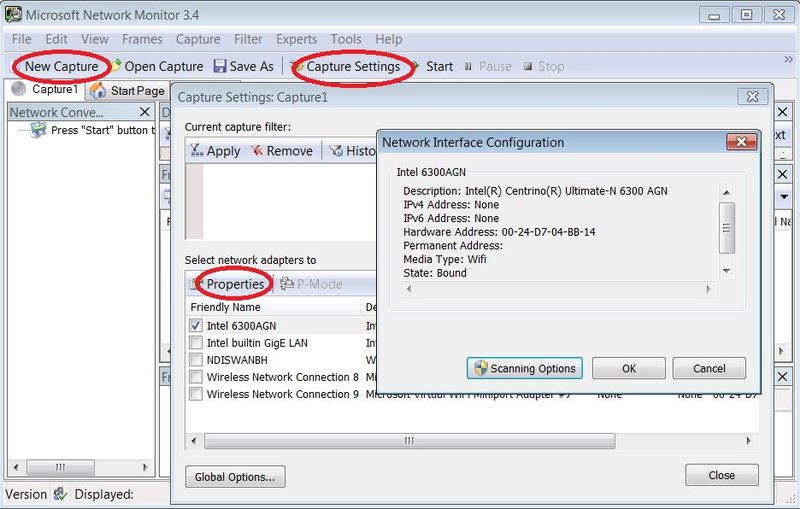
Click the New Capture button, then the Capture Settings button. This pops up the Capture Settings window. Highlight the adapter of interest and click Properties which pops up the Network Interface Configuration window.
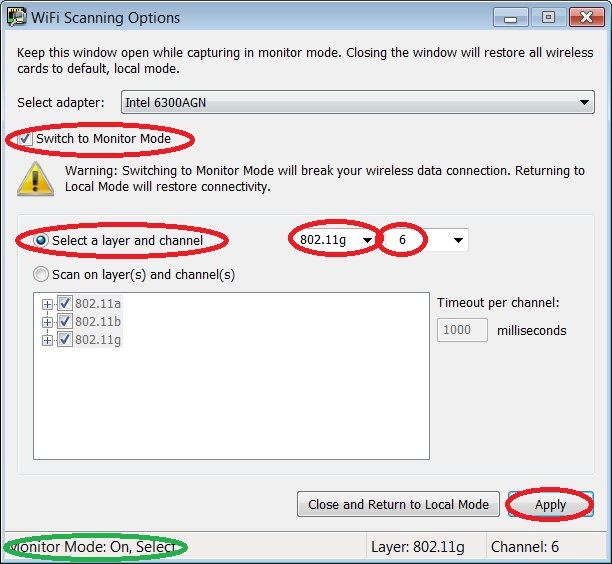
In the Network Interface Configuration window, click [Scanning Options]. This pops up the WiFi Scanning Options window. Check Switch to Monitor Mode. Select the Select a layer and channel button. Select the band and channel of interest. (With Intel, use "11a" for 5GHz and "11g" for 2.4GHz.)
Click [Apply]. Important: do not click [Close and Return to Local Mode], but keep the WiFi Scanning Options window up all the time you're capturing the sniff.
Now (keeping the WiFi Scanning Options window open), go back to the Network Interface Configuration window and click [OK] to get rid of it. [Close] the Capture Settings window. Back in the main Network Monitor window, click Start.
This should now cause NetMon to capture all wireless frames. Sometimes though it will just sit there and not capture any frames. When this happens, try restarting NetMon, disabling/reenabling the adapter, etc.
When done, click [Stop] and use File -> Save as to save the .CAP file.
Analyze with Wireshark
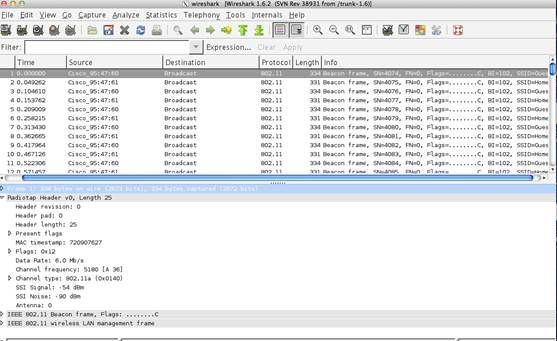
Wireshark up through 1.4.x cannot read a Netmon 2 format file. However, latest Wireshark (1.5 and above) can. The screenshot below is from Wireshark 1.5.1.
Problems
Netmon recently just stopped being able to see my wireless adapter - it simply was not present in the Netmon start page, even though it was up and working fine. Rebooting did not help. Uninstalling Netmon Parsers, then Netmon, then reinstalling NetMon 3.4, then logging off, then logging back on, did work.
If Netmon isn't sniffing on the right channel, then make sure that you restart Netmon and follow the steps aboveexactly. One you've started setting up a capture session and have set the channel via the WiFi Scanning Options window, Netmon will not track subsequent changes in that window.
Wireless Sniffing using Cisco Lightweight Access Point (LWAP) in Sniffer mode
Introduction
You can use the Cisco WLC and LAPs in sniffer mode, in conjunction with a wired sniffer (feature designed for AiroPeek/Omnipeek, but can work also with Wireshark).
A single wired sniffer can collect packets from multiple APs, so this method is very useful to run multi-channel traces. For static scenarios, if it’s possible to move the sniffer AP, this can be used as an effective alternative to other sniffing options.
For roaming scenarios, the sniffer APs are usually installed in the proximity of the APs the client roams through, and this will report the “point of view" of the static APs rather than the client.
In order to see the RF from the point of view of the client while roaming, a multi-channel wireless trace should be captured using a laptop with multiple Wireless NICs that will follow the test client.
Configuration steps
1) WLC / AP side
Here are the steps in order to collect a trace using a sniffer mode LAP
- Configure the AP in Sniffer mode:
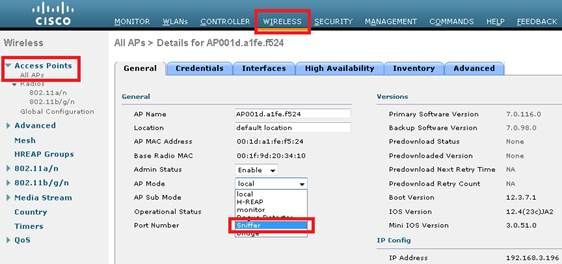
The AP will reboot and it will not be able to serve clients.
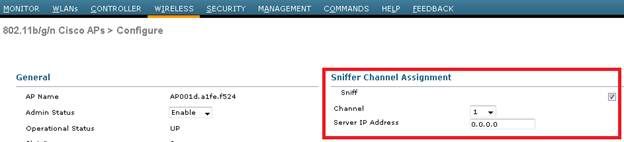
- Once the AP has re-joined the WLC, configure the radio of the AP (802.11b/g/n or 802.11a/n):
- specify the sniffer IP address
- select the channel
- enable sniffing
- The sniffer will receive the 802.11 traffic encapsulated using the airopeek protocol, from the WLC management IP address with source port UDP/5555 and destination UDP/5000
2) Sniffer side: Wireshark
If using Wireskark to receive the traffic, (Note: you must use wireshark 1.6.8 or earlier, newer versions have this support broken and the packets will not be decoded correctly) follow the steps below:
- Set the capture options to receive only traffic on UDP/5555:
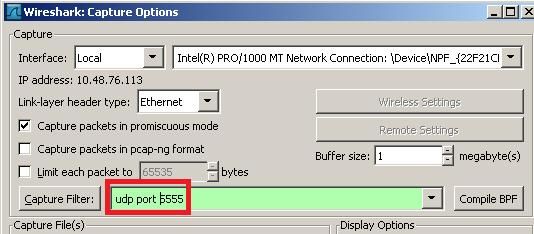
This filter is optional but strongly recommended as it excludes all the non-wireless related traffic from the capture. Consider that the WLC sends traffic to a UDP port there’s no application listening on the sniffer side; this results in having a ICMP port-unreachable response for each packet received from the WLC.
Although this is expected, the filter above helps to exclude also this traffic which is useless and so it can only cause the trace to be bigger and more difficult to read.
- Then, start the capture:

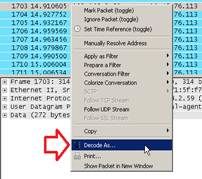
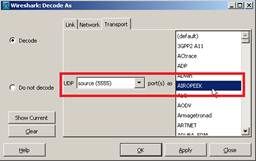
- The captured traffic has to be “decoded as.." AIROPEEK in order to be able to see the 802.11 traffic:
Note: In Wireshark releases 1.8 and higher, AIROPEEK has been renamed to PEEKREMOTE.
- The 802.11 traffic will now be visible:
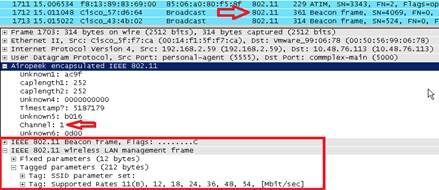
The RF info shown above (e.g. the channel, signal strength, noise..) are added by the AP. Wireshark can decode only some of these elements, whereas OmniPeek will show all of them.
3) Sniffer side: OmniPeek
When using OmniPeek as the receiver of the traffic stream from the WLC/AP in sniffer mode, it’s first of all necessary to create a “Cisco Remote Adapter" under the “Adapter" menu of the “Capture Options" window:
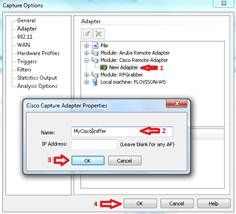
At least one adapter is required; the name is a mandatory field, whereas the “IP Address" field can be left blank if you don’t want OmniPeek to filter the incoming traffic from a specific WLC.
In this case it’s not necessary to filter out any traffic (such as the ICMP port-unreachable) as OmniPeek will listen on the UDP port to specifically capture the data stream from the Wireless LAN Controller.
Before starting the capture, confirm the settings on the main OmniPeek window:
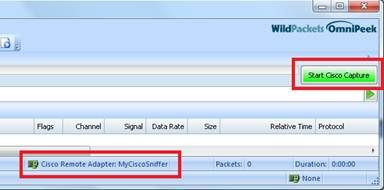
At this point the capture can be started and the result will be a trace including the RF info reported by the AP:
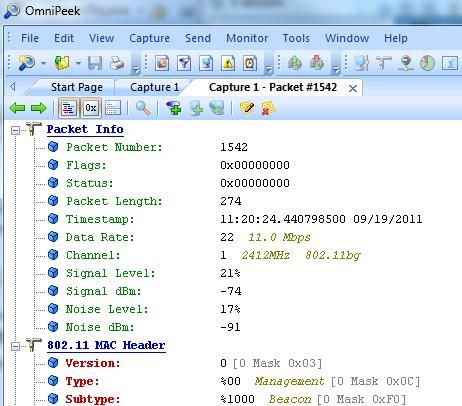
NOTE: By default OmniPeek remote adapter picks up the timestamp sent by the AP itself; this info has nothing to do with the AP clock, so the resulting timestamp will be incorrect. If you use a single sniffer AP the timestamps will be wrong but at least consistent; this is no longer true if you use multiple APs as sniffers (as every AP will send its own timestamp info, causing funky time jumps on the merged capture).
- Solution
You can explicitly tell OmniPeek to use the local sniffer PC clock to set the packet timestamp.
This solves both the single and multi AP scenario, having correct and consistent timestamps as long as the PC running OmniPeek has a NTP-sync’d clock.
- How-to steps:
In OmniPeek, do the following:
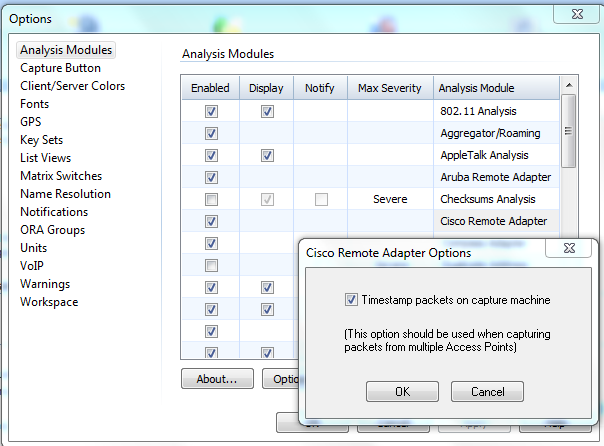
1. Go to Tools>Option>Analysis Modules
2. Search for cisco remote adapter then double click to bring out the options.
3. Tick on the Timestamp option then click OK and test again the capture.
Wireless Sniffing using OmniPeek Remote Assistant (ORA)
Introduction
Omnipeek Remote Assistant (ORA) - Cisco TAC can provide the Omnipeek Remote Assistant application to assist in performing wireless packet captures. The tool will capture wireless packets and encrypt them for processing by the TAC. A full version of Omnipeek Enterprise is required to decrypt and analyze the capture files.
Installation
You should receive a ZIP file from TAC – such as “ORADist_Default_7.0.zip" (the filename may change with different release versions). Unzip this file to some folder - to run ORA, simply launch OmniPeekRemoteAssistant.exe from that folder.
Supported Wireless Adapters and Drivers
Capturing Wireless Packets with ORA requires the use of supported Wireless Network Adapters along with the appropriate driver version. To view a complete list of supported adapters and drivers, please see:-
In most cases, the Ralink USB adapters will be the easiest to install - and, because you can install multiple USB adapters on a single laptop - they are the best way to get a multichannel capture. The following Ralink adapters have been tested by Cisco TAC:
Linksys WUSB600N (V1 and V2), Linksys AE1000, ALFA AWUS051NH
Driver Installation for Linksys USB600N with Windows XP
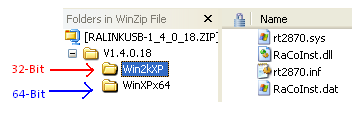
Step 1. TAC can provide the OmniPeek driver for the Ralink USB adapters. You should receive a ZIP file “RALINKUSB-1_4_0_18.ZIP". There will be 2 folders in the archive -- “Win2kXP" for 32-bit Windows and “WinXPx64" for 64-bit Windows. Extract the contents of the appropriate folder for your operating system to a specified location.
Step 2. Insert the Linksys USB600N adapter.
a. If this is the first time using the adapter on the workstation, Windows will start the New Hardware Wizard. Do not search for a driver automatically and click Next. Skip to step 3.
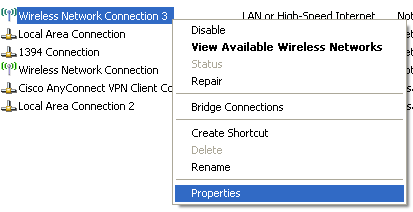
b. If you have previously installed the Linksys USB600N on your workstation, you will need to change the driver to the Omnipeek version. Go to Start > Control Panel > Network Connections and Right Click on the Linksys adapter and click Properties. In this example, the interface is “Wireless Network Connection 3".
Under the General Tab, Click the “Configure…" button, and then click on the Driver Tab > Update Driver. This will prompt the Hardware Update Wizard.
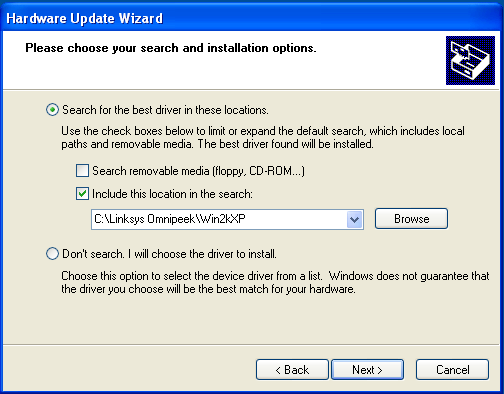
Step 3. Select “Install from a list or specific location (Advanced)" and click Next. Select “Search for the best driver in these locations.", include the location of your extracted driver files and click Next:-
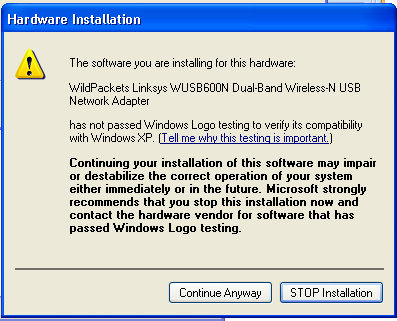
Step 4. Windows will now search and install the Omnipeek driver. If you receive the following warning message, click “Continue Anyway".
Step 5. The driver installation should complete and the adapter is now ready for capturing packets with ORA.
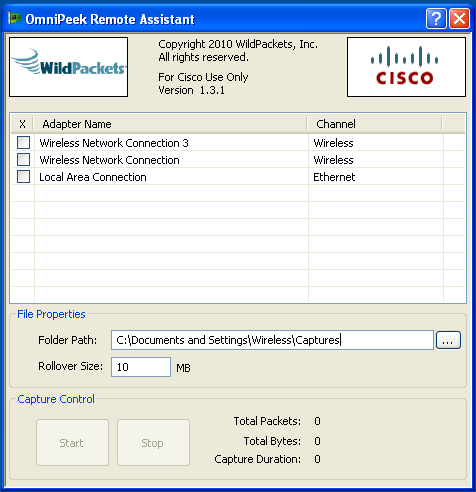
Running Omnipeek Remote Assistant
If the correct driver isn’t loaded, ORA may appear to work, but not provide the option to select the desired channel to monitor. The Channel cell will read ‘Ethernet’ or ‘Wireless’ and not offer the option to select a channel:-
Capture Settings
Select the desired adapter(s) to perform the capture and indicate the desired channel. If you have multiple supported adapters installed you can capture on multiple channels simultaneously (but you cannot mix wired and wireless interfaces at the same time). You can select either an 802.11b/g channel or 802.11a channel in the dropdown. You can select 40 MHz 802.11n channels using the (n40l) or (n40h) options. The n40l will be the selected channel and adjacent lower channel, while n40h will be the selected channel and adjacent higher channel.
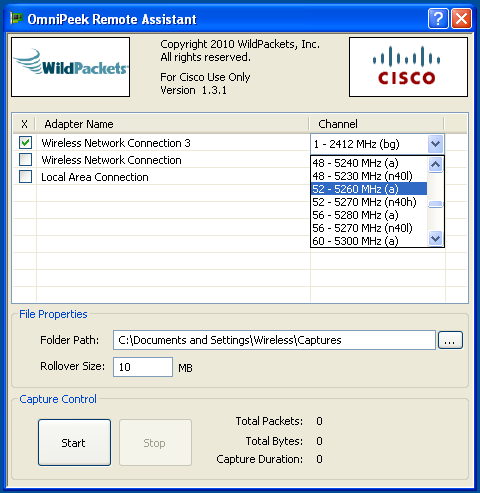
File Properties
Select the folder you would like to store the capture files in. You can then also specify the file rollover size. Each new filename will include a timestamp so data will not be overwritten.
Capture Control
If you have selected correct adapter/channel settings, you will now be able to click the Start/Stop buttons at the bottom. You will not be able to see the packets, but you will see the counters incrementing. Click Stop when finished